概要
EC2 上で稼働している Elasticsearch から Amazon Elasticsearch Service に移行する必要があり、データの移行を行います。
ツールは Elasticsearch の Snapshot の機能を使用して実施します。
Shapshot は S3 に直接作成することもできるようですが、今回は EC2 上に作成し、それを S3 にコピーする方法でやっていきます。


Snapshot の作成
Snapshot を作成するにあたり、事前に Snapshot 保存用のリポジトリの設定が必要があります。合わせて、Snapshot 保存用のディレクトリも必要になるので、作成していきます。

Snapshot 保存用のディレクトリを作成
mkdir ./els-snapshot
chwon elasticsearch. ./els-snapshot
リポジトリの登録
Elasticsearchの設定ファイル(/etc/elasticsearch/elasticsearch.yml)に作成したディレクトリを登録し、ノードを再起動します。
path.repo: ["/path/to/snapshot"]
リポジトリを登録します。
PUT _snapshot/migration-repository
{
  "type": "fs",
  "settings": {
    "location": "/path/to/snapshot"
  }
}
リポジトリが登録されたことを確認します。
GET _snapshot
スナップショットの作成
Snapshotを作成します。

PUT _snapshot/migration-repository/migration-snapshot
{
    "indices": "migration-index1,migration-index2,other-indices-*",
    "ignore_unavailable": true,
    "include_global_state": false
}
取得された Snapshotを確認します。
GET _cat/snapshots/migration-repository

GET _snapshot/migration-repository/migration-snapshot
Snapshotディレクトリにファイルが作成されていることが確認できます。
ls -l /path/to/snapshot
Snapshot のリストアの事前準備
Amazon Elasticsearch Service にリストアするためには S3 に Snapshot のデータを格納し、そこから読み込んでリストアを行います。
S3バケットの作成
aws s3 mb s3://es-migration-snap --region ap-northeast-1
S3 バケットへのファイル転送
作成したバケットのバケットポリシーに下記の内容を追記し、EC2(別アカウント) から S3 にアクセスできるように設定します。
{
    "Version": "2012-10-17",
    "Statement": [
        {
            "Effect": "Allow",
            "Principal": {
                "AWS": "arn:aws:iam::xxxxxxxxxxxx:role/es01"
            },
            "Action": "s3:ListBucket",
            "Resource": "arn:aws:s3:::es-migration-snap"
        },
        {
            "Effect": "Allow",
            "Principal": {
                "AWS": "arn:aws:iam::xxxxxxxxxxxx:role/es01"
            },
            "Action": [
                "s3:GetObject",
                "s3:PutObject",
                "s3:PutObjectAcl"
            ],
            "Resource": "arn:aws:s3:::es-migration-snap/*"
        }
    ]
}
EC2 で下記のコマンドを実行し、Snapshot のファイルを S3 に転送します。
aws s3 sync . s3://bucket-name -acl bucket-owner-full-control
Elasticsearch Service が S3 にアクセスできるように設定
AmazonESSnapshotRole という Role を作成して ES にマッピングし、ES が S3 にアクセスできるように設定します。
ポリシーの作成
Elastibsearch が Snapshot 用の S3 バケットにアクセスできるようにポリシーを作成します。
aws iam create-policy --policy-name es-snapshot-pol --policy-document file://es-snapshot-pol.json
es-snapshot-pol.json
{
  "Version": "2012-10-17",
  "Statement": [
    {
      "Action": [
        "s3:ListBucket"
      ],
      "Effect": "Allow",
      "Resource": [
        "arn:aws:s3:::es-migration-snap"
      ]
    },
    {
      "Action": [
        "s3:GetObject",
        "s3:PutObject",
        "s3:DeleteObject"
      ],
      "Effect": "Allow",
      "Resource": [
        "arn:aws:s3:::es-migration-snap/*"
      ]
    }
  ]
}
Roleの作成
assume role を指定して、Roleを作成します。
aws iam create-role --role-name AmazonESSnapshotRole --assume-role-policy-document file://es-snapshot-trust-pol.json
es-snapshot-trust-pol.json
{
  "Version": "2012-10-17",
  "Statement": [{
      "Effect": "Allow",
      "Principal": {
        "Service": "es.amazonaws.com"
      },
      "Action": "sts:AssumeRole"
    }
  ]
}
Roleにポリシーをアタッチ
作成した Role にポリシーをアタッチします。
aws iam attach-role-policy --policy-arn arn:aws:iam::xxxxxxxxxxxx:policy/es-snapshot-pol --role-name AmazonESSnapshotRole
pass-role のアタッチ
AmazonESSnapshotRole を Elasticsearch に AmazonESSnapshotRole を渡せるように下記のポリシーを操作をする IAM Userにアタッチします。
{
  "Version": "2012-10-17",
  "Statement": [
    {
      "Effect": "Allow",
      "Action": "iam:PassRole",
      "Resource": "arn:aws:iam::xxxxxxxxxxxx:role/AmazonESSnapshotRole"
    },
    {
      "Effect": "Allow",
      "Action": "es:ESHttpPut",
      "Resource": "arn:aws:es:ap-northeast-1:xxxxxxxxxxxx:domain/migration-domain/*"
    }
  ]
}
Elasticserach の作成
下記のコマンドを実行し、Elasticsearch を作成します。
aws es create-elasticsearch-domain \
  --domain-name migration-domain \
  --elasticsearch-version 7.10 \
  --elasticsearch-cluster-config InstanceType=t3.medium.elasticsearch,InstanceCount=1 \
  --ebs-options EBSEnabled=true,VolumeType=gp2,VolumeSize=50 \
  --node-to-node-encryption-options Enabled=true \
  --encryption-at-rest-options Enabled=true \
  --domain-endpoint-options EnforceHTTPS=true,TLSSecurityPolicy=Policy-Min-TLS-1-2-2019-07 \
  --advanced-security-options Enabled=true,InternalUserDatabaseEnabled=true,MasterUserOptions='{MasterUserName=master-user,MasterUserPassword=xxxxxx}' \
  --access-policies '{"Version":"2012-10-17","Statement":[{"Effect":"Allow","Principal":{"AWS":["*"]},"Action":["es:ESHttp*"],"Resource":"arn:aws:es:ap-northeast-1:xxxxxxxxxxxx:domain/migration-domain/*"}]}' \
  --region ap-northeast-1
role のマッピング
ドメインの作成が完了したら、マスターユーザで Kibana にログインします。
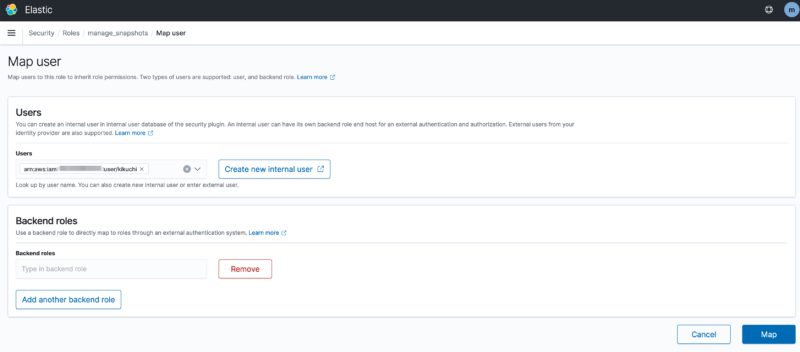
Kibana のメニューから Security → Roles → manage_snapshots → Managed users タブをクリクします。
Managed mapping をクリックすると、Users または Backend Role を入力する画面が表示されます。
IAM Userで認証をしている場合には、Usersのところに、IAM UserのARNを入力、Roleで認証をしている場合には、Backend roles のところに IAM Role のARNを入力し、Mapをクリックします。
※ Userを作成していない場合には、Create new Internal user をクリックしてユーザを作成する必要があります。
Snapshot の リストア
リポジトリの作成
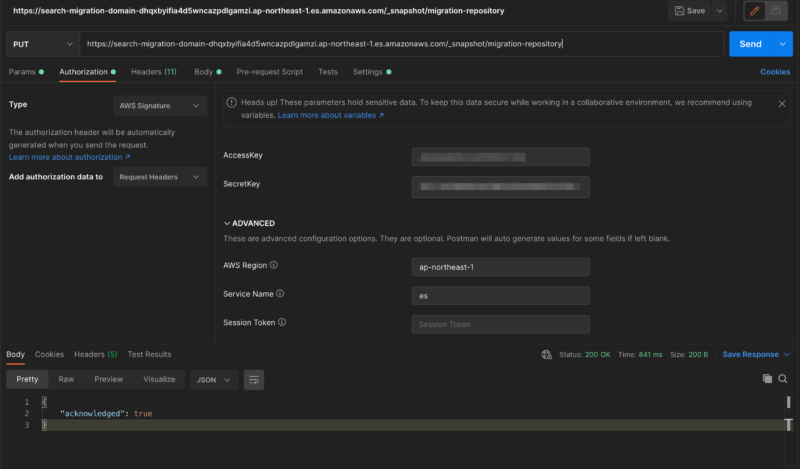
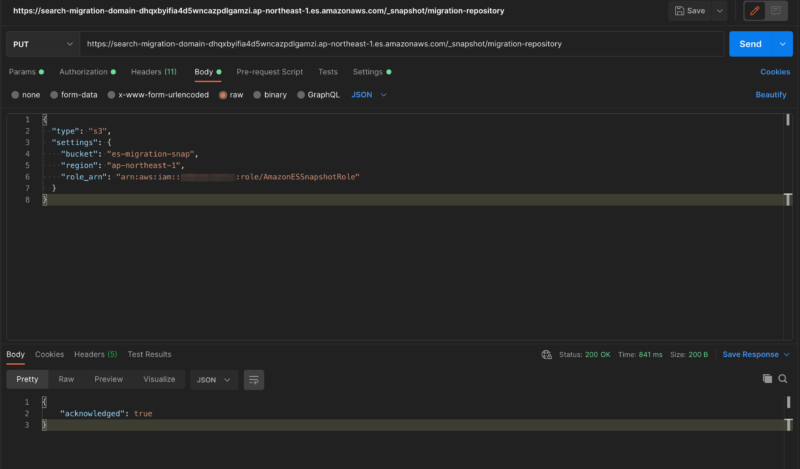
Postman を使用して、リポジトリの登録を行います。
PUT _snapshot/migration-repository

{
  "type": "s3",
  "settings": {
    "bucket": "es-migration-snap",
    "region": "ap-northeast-1",
    "role_arn": "arn:aws:iam::xxxxxxxxxxxx:role/AmazonESSnapshotRole"
  }
}
Snapshot のリストア
リポジトリ内の Snapshot の一覧を表示し、復元する Snapshot を確認します。
以降のコマンドの発行は Postman からではなくて、問題有りません。
GET _snapshot/migration-repository/_all
Snapshot のリストアを行います。
POST _snapshot/migration-repository/migration-snapshot/_restore
{
  "indices": "migration-index1,migration-index2,other-indices-*",
  "include_global_state": false
}
インデックス が移行されていることを確認します。
GET _cat/indices?v
参考


コメント